
How it works
How to write your own crochet pattern
Designing your own amigurumi is two jobs at once: deciding the shape, and keeping the stitch counts honest while you write it down. This page walks through both in eight steps, in the Crochet 3D planner, where every round is counted for you and the piece grows as a 3D model while you type. At the end there is a small pattern to copy in and try it all on.
- write a round the way patterns are written, and read anyone else's
- keep every stitch count right without counting by hand
- see the shape before you commit an evening of yarn to it
- colour it, place the pieces, and export a pattern someone else can follow
About ten minutes to read, twenty with the exercise.
Open the planner and choose a start
The planner lives at Pattern Planner in the menu. It needs an account, and the account is free.
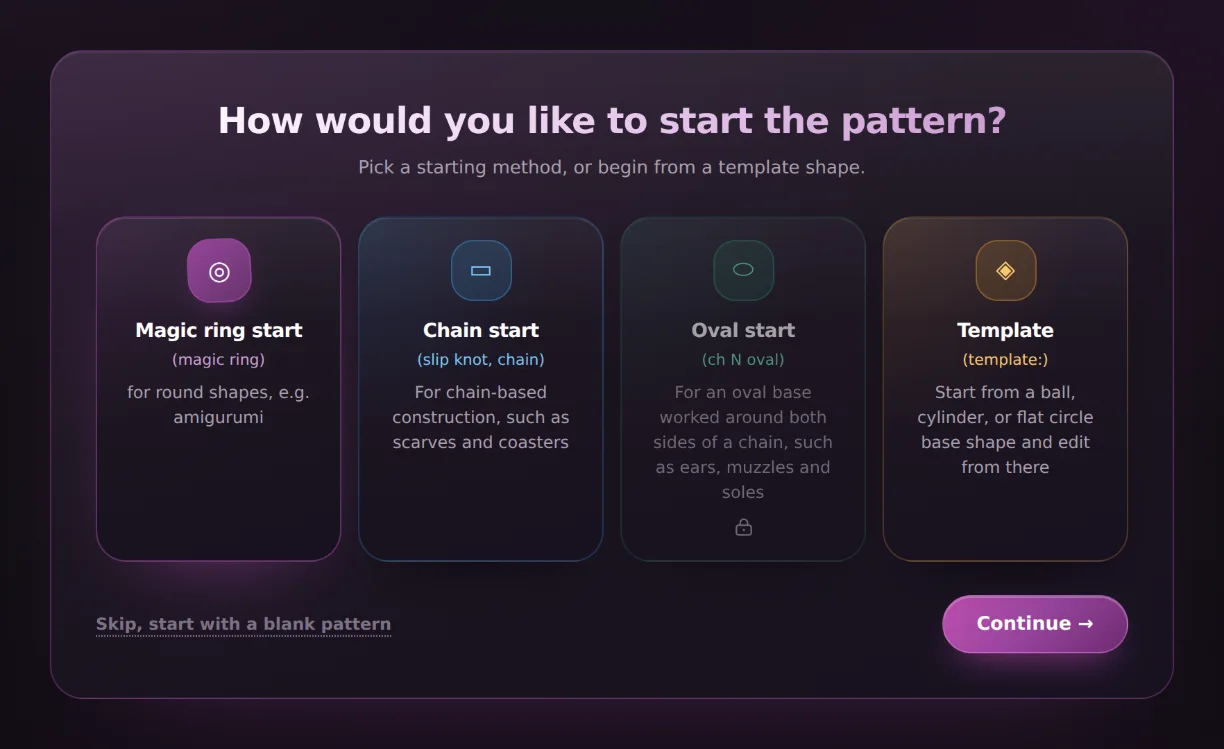
The first screen is the start wizard. It asks one question: how does the piece begin? Four cards answer it.
- Magic ring
- For round shapes worked in a spiral, which is nearly every amigurumi. This is the one to pick for the exercise below.
- Chain
- For flat pieces worked in rows and turned at each end: scarves, coasters, a flat panel.
- Oval
- A chain worked around both of its sides, the base of a foot or a body lying down. Opens with Hobby.
- Template
- A ball, a cylinder or a flat circle in three sizes, written out in full so you can edit it rather than start from nothing.
Continue opens the workspace with a three-round starter already written, so there is always something on screen to copy from. The link under the cards opens an almost empty pattern instead, with three comments saying what goes where.
Get to know the workspace
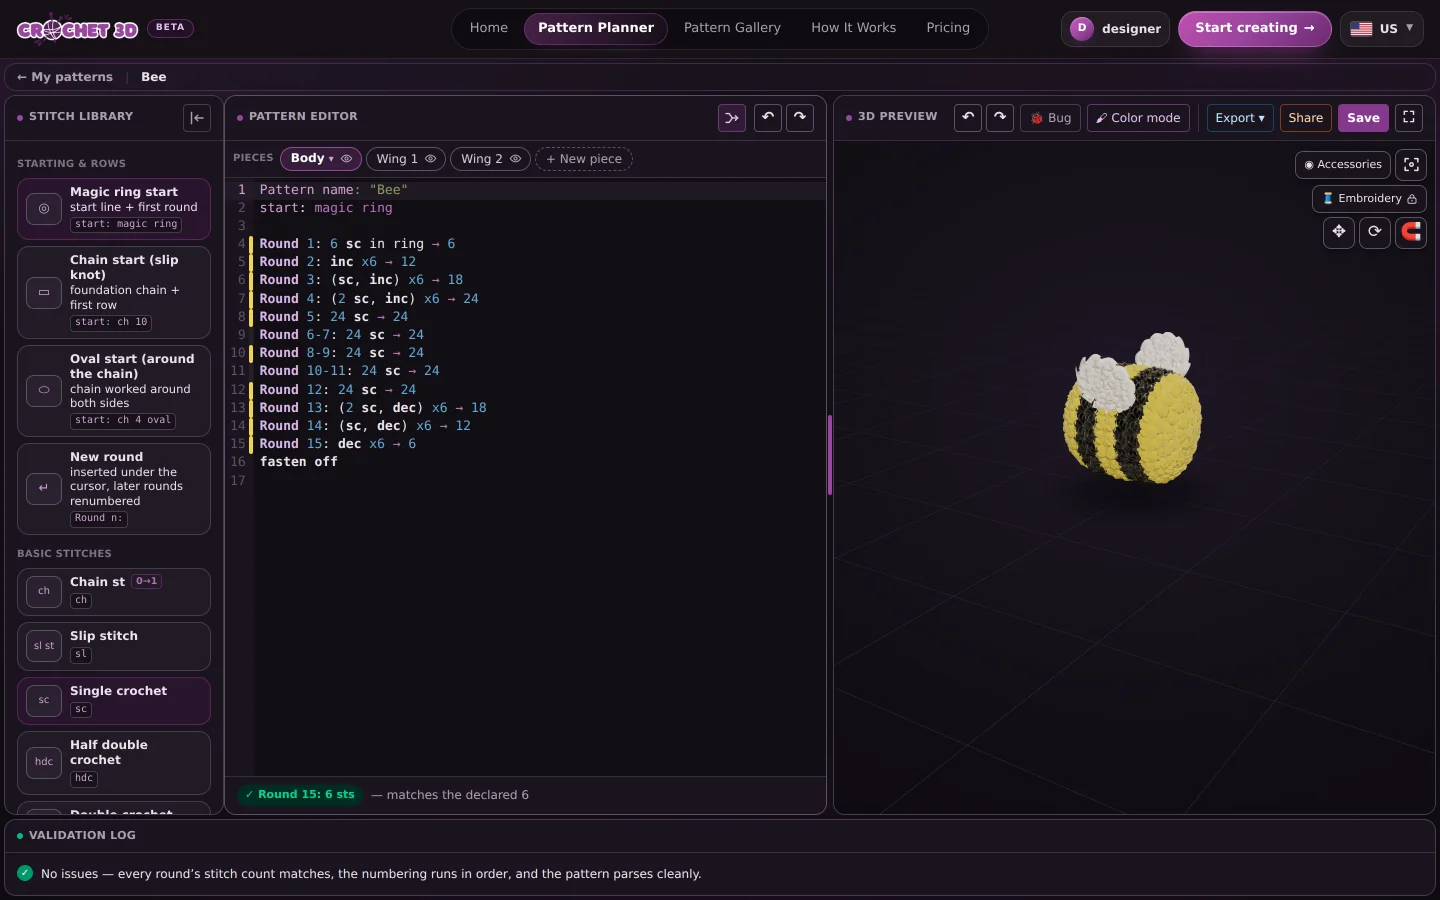
Three panels side by side, a log underneath them, and two thin strips above the text.
Everything on the screen follows the text in the middle. The library writes into it, the 3D view is built from it, the log reads it. Once that is clear, the rest of the buttons explain themselves.
- Stitch library
- Every stitch the planner knows, grouped by what it does. Click a card and it is typed into your pattern at the cursor. The small N→N on a card says how many stitches it works into and how many it makes.
- Pattern editor
- Your pattern, as text. One round per line. Undo and redo are the two arrows above it, and Ctrl+Z works too. Every piece keeps its own history.
- Pieces bar
- An amigurumi is several crocheted pieces: a body, two wings, an ear. Each gets a tab here with its own text, and the 3D view shows them together.
- Row bar
- Watches the last round of the piece. Green means the stitch count matches the number you wrote at the end of the line. Orange says what does not add up.
- 3D preview
- The pattern, crocheted. It rebuilds a moment after you stop typing. Drag to turn it, scroll to zoom, drag with the right button to move it. The button in its corner opens it across the whole window.
- Validation log
- Every problem the planner found, with the line it is on and what would be right. Green means everything is in order.
On a phone the same workspace is two tabs, Pattern and 3D, and the colour picker sits under the 3D view instead of over it.
Write a round
The notation is the one crochet patterns already use, in US terms. If you can write a pattern down, you can type it here.
There is no drawing tool and no grid to fill in. Each line is one round, and the planner works out from the stitches on it how many stitches the round makes. Here is one line from the bee, taken apart.
Round 4 [#F0D64B]: (2 sc, inc) x6 → 24
- Round 4
- Which round this is. Rounds are worked continuously in a spiral; rows (
Row 4) are turned at each end. The planner keeps the numbering honest and offers to fix it when a number skips. - [#F0D64B]
- The yarn colour of the whole round, as a hex code. Optional. The planner writes these itself when you colour on the model; here it is the bee's yellow.
- (2 sc, inc) x6
- Work the group in the brackets six times: two single crochet, then an increase. An increase is two stitches into one, so the round grows by six.
- → 24
- How many stitches the round should end with. The planner works out the real number from the stitches and tells you when the two disagree.
- The first two lines name the pattern and say how it starts:
Pattern name: "Bee", thenstart: magic ring, orstart: ch 10for a chain. - One round per line, as
Round 3:orRow 3:. Rounds that repeat are written as a range:Round 6-7: 24 sc → 24. - Stitches are written in US terms: sc, hdc, dc, inc, dec, ch, sl st. A number in front repeats a stitch, so
24 scis twenty-four single crochet. - A group in brackets repeats with a multiplier:
(2 sc, inc) x6, or6x (2 sc, inc). Both orders mean the same round. - The arrow and number at the end,
→ 24, is what the round should count to. It is not an instruction. It is the claim the planner checks. fasten offon its own line closes the piece. A line starting with//is a note the planner skips.
The library types any of this for you: click a stitch card and the token lands at the cursor, click the ↵ card and a new numbered round opens under it.
- Free: ch, sl st, sc, hdc, dc, inc and dec, which is every stitch in the bee and in most amigurumi.
- Hobby adds tr, dtr, the triple increase and decrease, skip, and the oval start.
- Designer adds the textured stitches (bobbles, puff, popcorn, shell) and the notation around them: front and back loop only, several stitches in one stitch, chains worked back on themselves.
Let the counts be checked
Most amigurumi patterns fail on arithmetic, not on technique. The planner does the arithmetic on every keystroke.
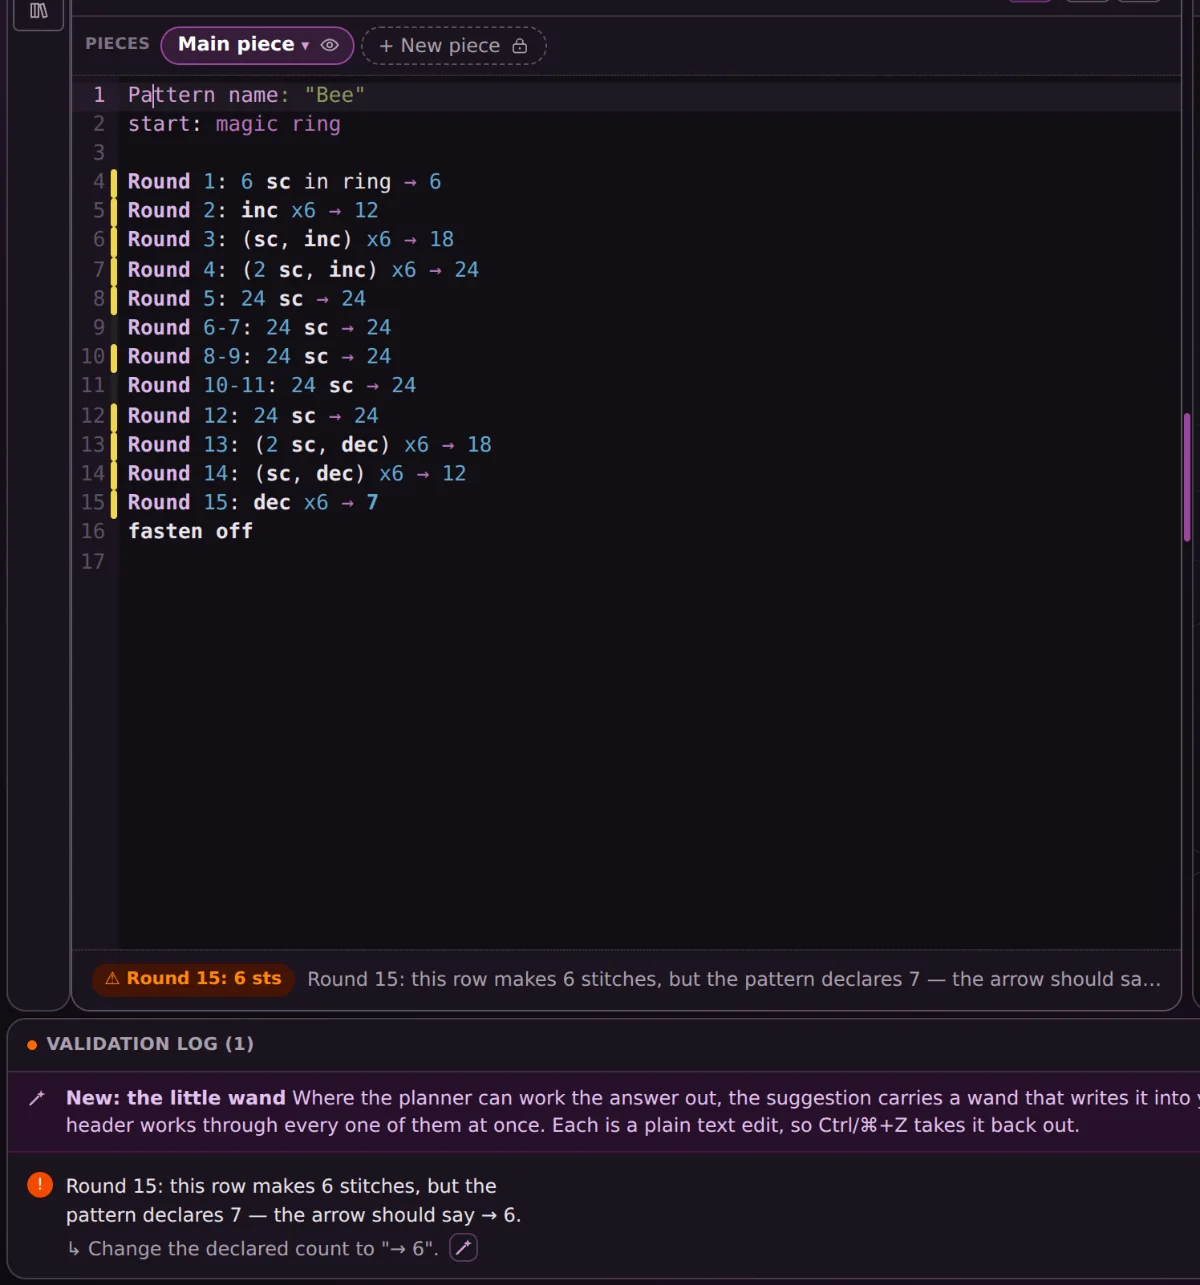
Every round is counted against the round above it. A round that claims 7 stitches while its instructions make 6 is named in the log with its line number, and when it is the last round of the piece the row bar under the text turns orange too, before you have crocheted it twice. A repeat that does not divide into the round, a decrease bigger than the round it works into, a round number that skips, a stitch it does not recognise: each of these is a line in the log.
Under most of them there is a small wand. Press it and the fix is written into your text: the count corrected, the round renumbered, the typo replaced. Ctrl+Z puts it back if you disagree.
The 3D model plays its part too. When a round cannot sit on the round before it, the model stops at that round rather than inventing a shape. Everything above the fault still builds, and the text is never changed for you. A shape you can see is a shape you could crochet.
Turn the model and place the pieces
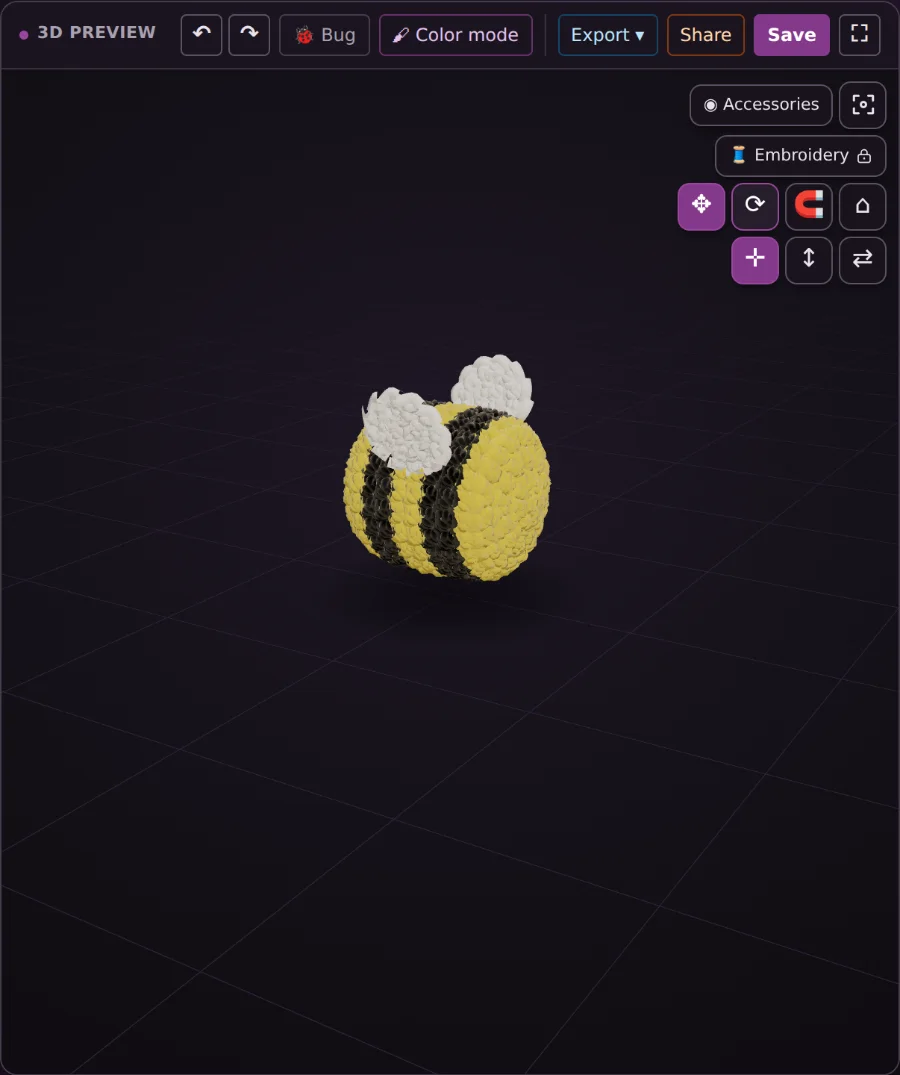
The 3D view is where a pattern shows what the numbers cannot: the silhouette.
Drag to turn the model, scroll to zoom, drag with the right mouse button to move it around. The recentre button puts the whole workspace back in frame, and the corner button opens the view across the window. A round that increases too fast shows as a frill, one that increases too slowly as a cone, long before the yarn does.
With more than one piece, three tools beside the view place them: ✥ moves the selected piece, ⟳ turns it, ⌂ puts it back where it started. A row of one-click positions appears with each tool. Wherever a piece ends up, the planner writes its place into that piece's text as two header lines, position: and rotation:, so a placement can be copied from an ear onto a tail.
The 3D view has an undo of its own, separate from the text's: it steps back through moving, turning and colouring, not through what you typed.
Colour it on the model
Colour work is planned by clicking the stitches, and every click is written back into the pattern.
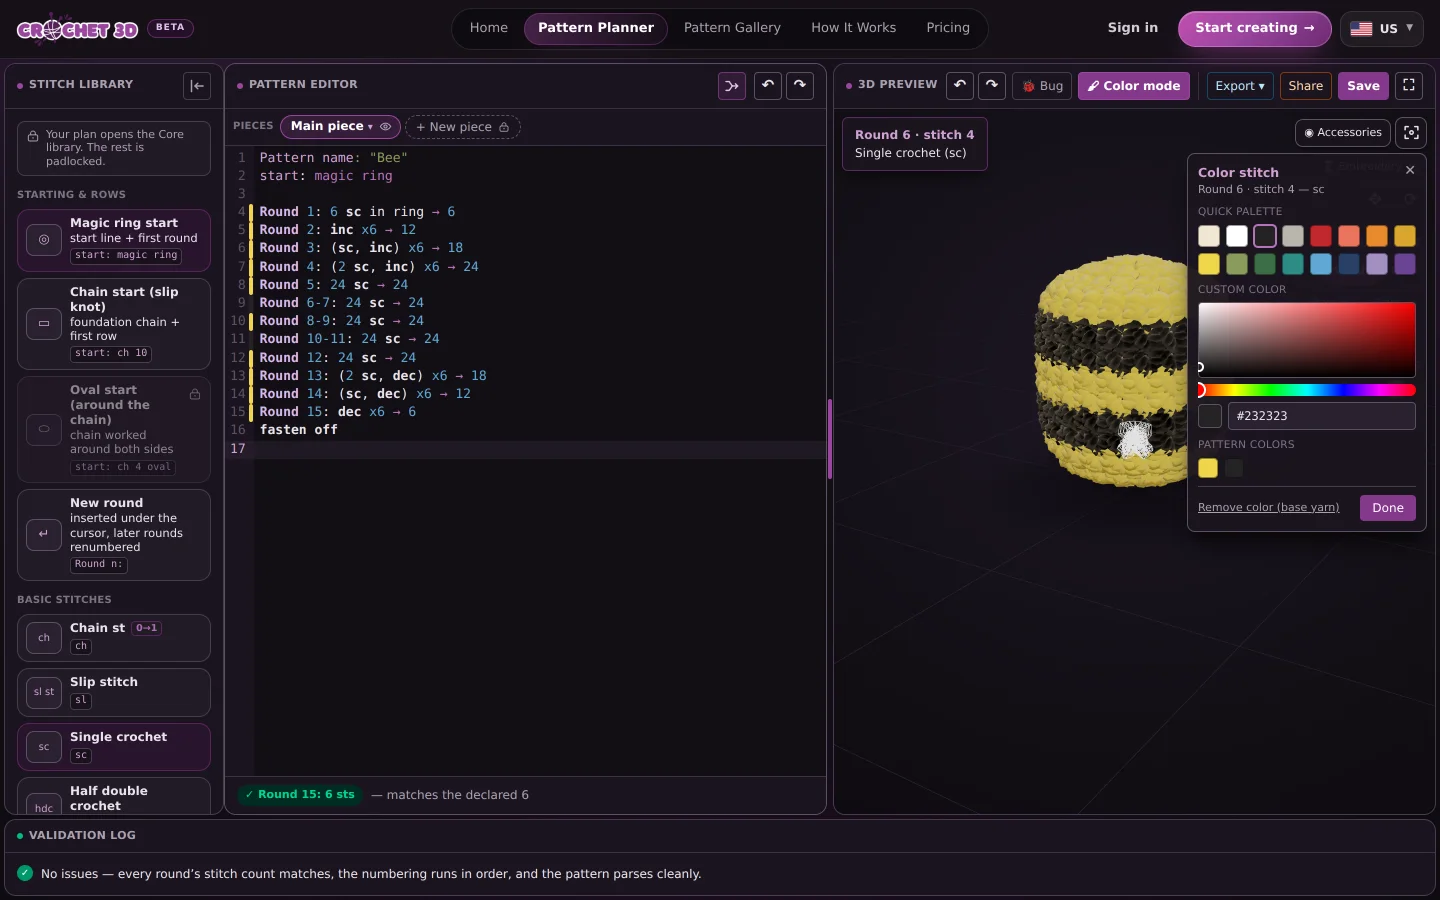
Colour mode switches the 3D view from turning the model to colouring it. Click a stitch, pick a yarn colour from the picker, and the colour appears on the model and in the text at the same moment. A whole round carries its colour after the label, Round 6-7 [#232323]:, a run of stitches carries it after the stitch, 2 sc[#F4F1EA], and one half of an increase can be coloured on its own, inc[,#F4F1EA].
The buttons under the mode choose how much a click colours: one stitch, several selected stitches, a whole coloured patch, a row, several rows, or the whole piece. The patch scope works a spot at a time: click any stitch of it and the whole spot comes with it, while the other spots in the same colour stay as they are. One stitch and a selection are free; the patch, row, rows and whole-piece scopes open with Hobby. Replacing a colour everywhere it appears is free on every plan.
Typing a tag by hand works just as well. The bee's stripes below are nothing but whole-round tags.
Pieces, safety eyes and embroidery
A finished plush is more than one piece of crochet, and more than crochet.
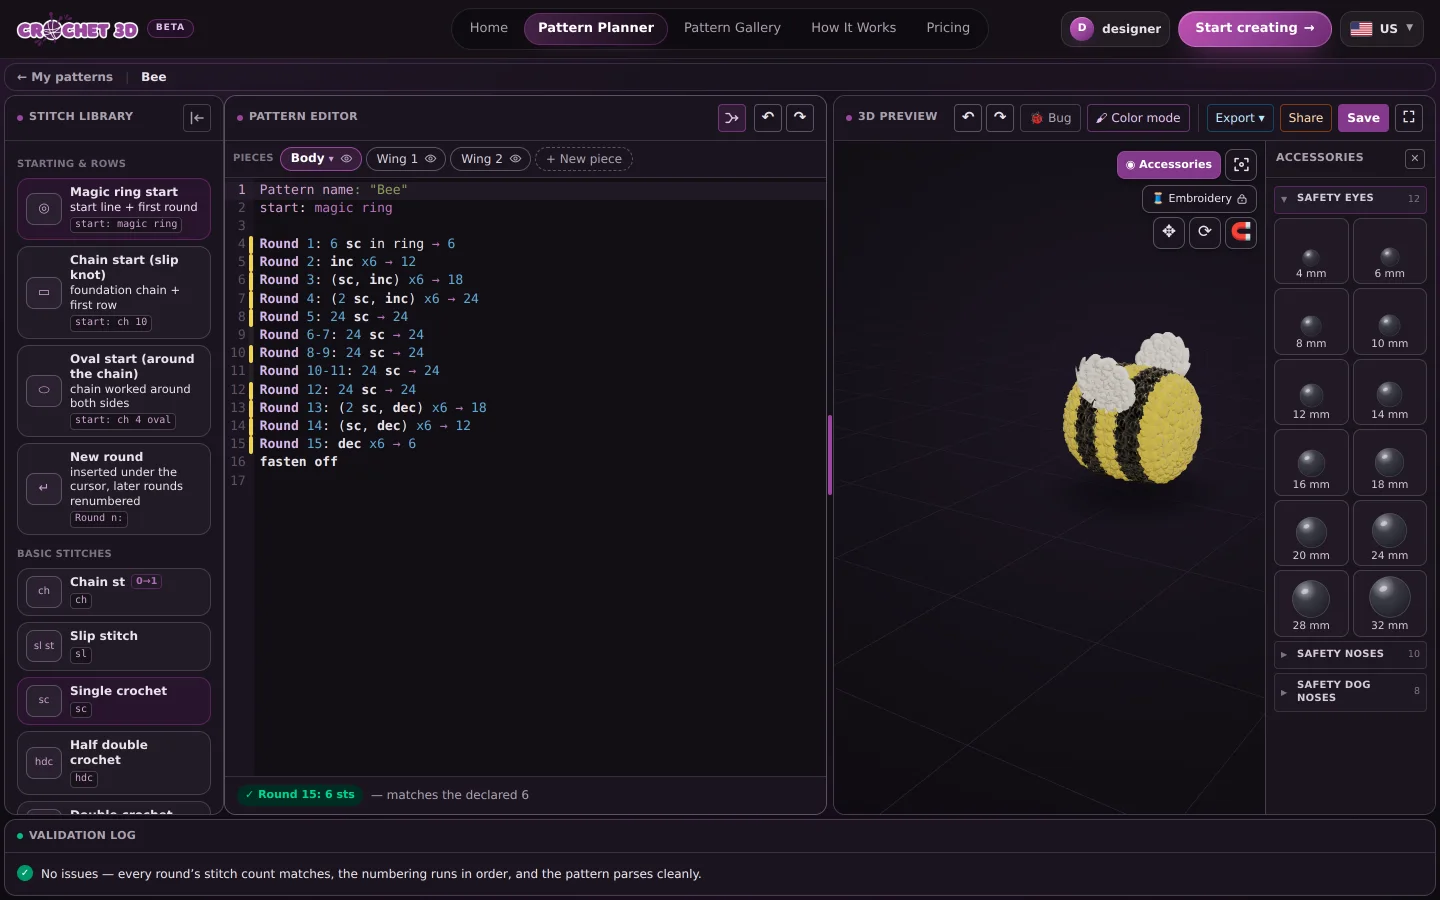
Each piece of a project has its own tab, its own text and its own undo. Add, rename, duplicate or delete a piece from the bar, or hide one from the preview with the eye. Opening a pattern with several pieces works on every plan; adding a piece to a project of your own opens with Designer.
Safety eyes, safety noses and dog noses come in their real millimetre sizes. Open a category in the accessory library, pick a size and drag it onto the model. It sits on the fabric facing outward, it is saved with the pattern, and it is drawn in the PDF+ export. Accessories open with Designer.
Surface embroidery is the thread detail sewn onto a finished piece: whiskers, a mouth, an eyebrow. The 🧵 tool draws a thread from one stitch to another, and the line comes out in the written pattern and in both PDF editions as a finishing instruction. Sewing a new thread opens with Studio; a thread already on a piece can be moved, recoloured and deleted on every plan.
Save, share, export
Three buttons at the top right take the pattern somewhere: your account, the gallery, or a file.
Save keeps the whole project on your account: every piece, the arrangement, the colours, the accessories. It is waiting on your next visit and on your other devices. The free account holds 3 saved patterns; Hobby holds 15, Designer holds 30, Studio has no limit.
Share publishes the pattern to the community gallery with a snapshot of the 3D view. Anyone can then open it in their own editor, like it and adapt it. It needs a pattern that builds, and the post is public.
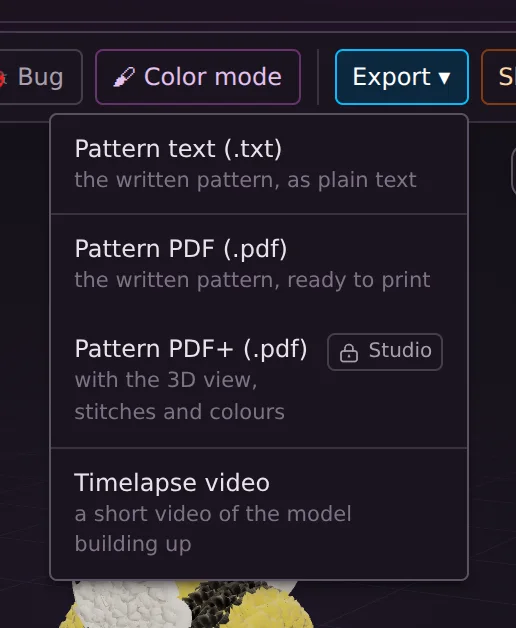
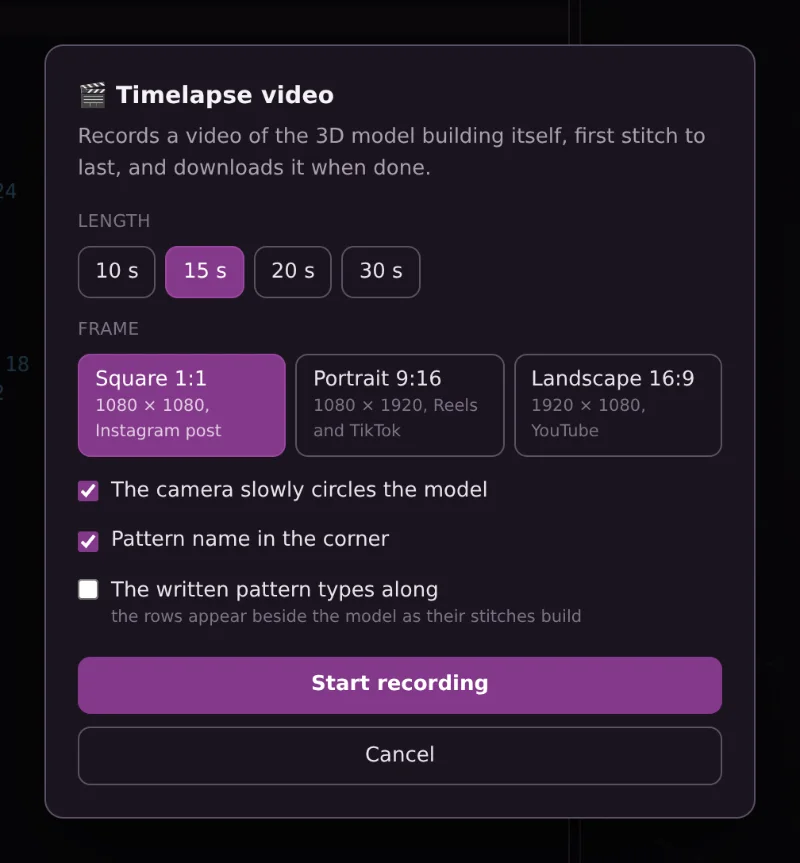
Export offers four files. The written pattern as plain text (Hobby). A printable PDF with the rounds, the materials and the stitch key (Designer). A PDF+ that also carries the 3D view, the stitch counts and the colours (Studio). And a timelapse video of the model building itself, stitch by stitch: 10 to 30 seconds long, square for a post, portrait for Reels and TikTok or landscape for YouTube, with the camera circling if you like and the written pattern typing along beside the model (Designer). It is recorded in your browser and nothing is uploaded. The penguin at the top of this page is one.
Try it
Your first pattern: the bee
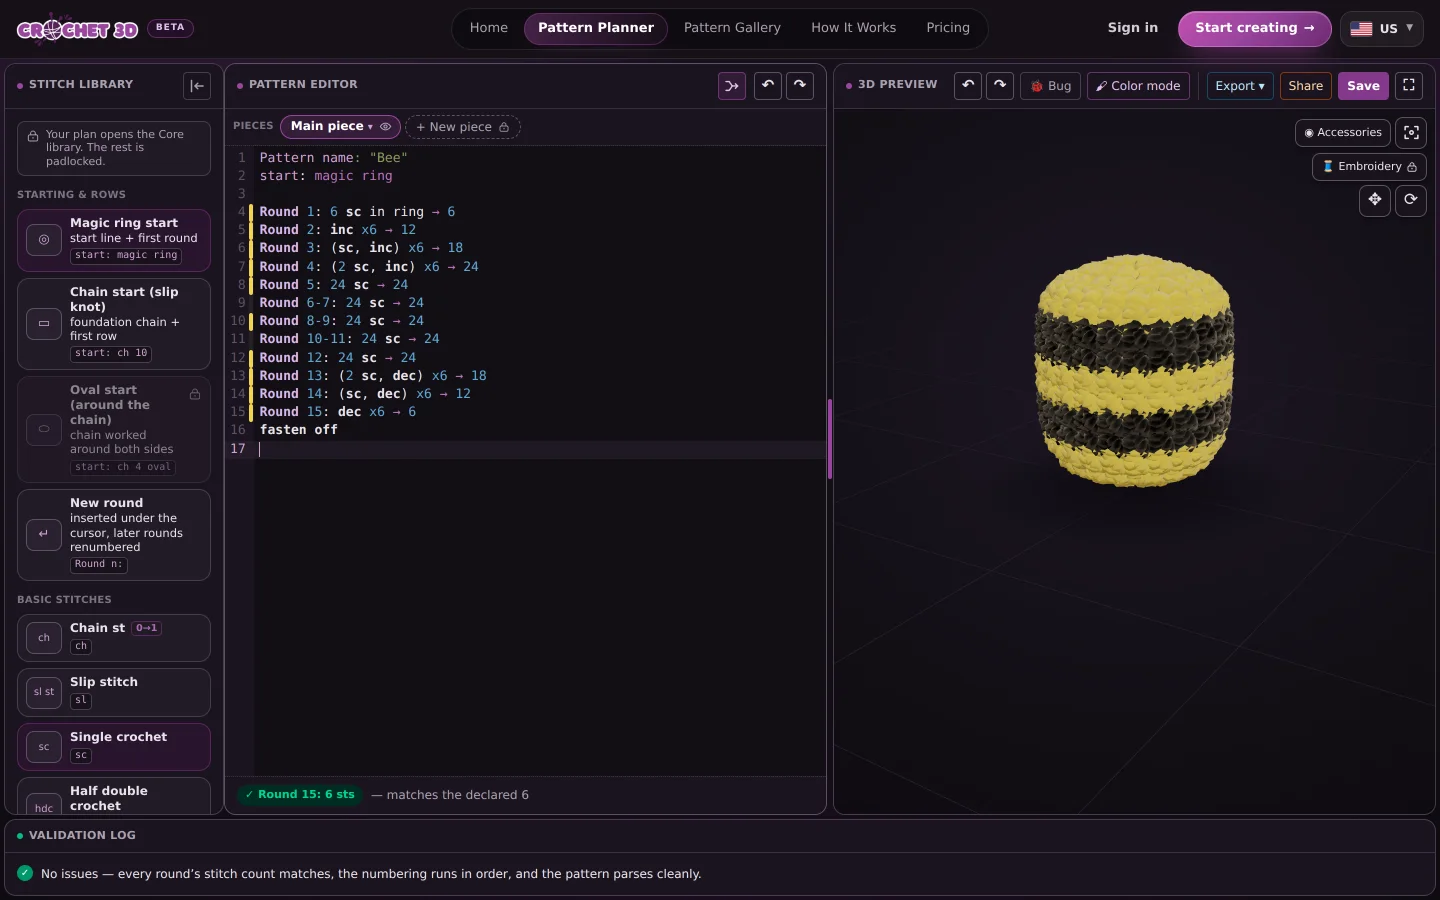
The simplest pattern in the gallery. A striped body of fifteen rounds that uses nothing but sc, inc and dec, so it opens and builds on the free plan, and two wings of two rounds each. Copy the body, paste it into the planner, and use it to try everything above.
Pattern name: "Bee"
start: magic ring

Round 1 [#F0D64B]: 6 sc in ring → 6
Round 2 [#F0D64B]: inc x6 → 12
Round 3 [#F0D64B]: (sc, inc) x6 → 18
Round 4 [#F0D64B]: (2 sc, inc) x6 → 24
Round 5 [#F0D64B]: 24 sc → 24
Round 6-7 [#232323]: 24 sc → 24
Round 8-9 [#F0D64B]: 24 sc → 24
Round 10-11 [#232323]: 24 sc → 24
Round 12 [#F0D64B]: 24 sc → 24
Round 13 [#F0D64B]: (2 sc, dec) x6 → 18
Round 14 [#F0D64B]: (sc, dec) x6 → 12
Round 15 [#F0D64B]: dec x6 → 6
fasten off
- Open the Pattern Planner, sign in or create the free account, and choose Magic ring. Press Continue.
- Click into the pattern editor, select everything with Ctrl+A (⌘A on a Mac) and paste with Ctrl+V. On a phone, do this on the Pattern tab.
- Wait a moment. The body builds in the 3D view, and the row bar under the text turns green at 6, the count of the last round.
- Read the rounds against the model. Rounds 1 to 4 are the magic ring and three increase rounds,
6 → 12 → 18 → 24. Rounds 5 to 12 are straight, and the black rounds are the stripes: nothing but a colour tag after the label. Rounds 13 to 15 decrease back to six, andfasten offcloses the piece.
Five things to try on it
Drag the model round, scroll in, and look at it from below. The last round has closed to six stitches, which is where the stuffing goes in before the hole is cinched.
Switch on Colour mode, click a stitch in a black stripe and pick a colour. Then look at the text: the tag on that round changed with it. The 3D view's own undo arrow puts it back. On Hobby and up, the patch scope takes the whole stripe in one click, all 48 stitches of it, and leaves the other black stripe as it was.
On the last round change → 6 to → 7. The row bar turns orange, the log names the line and the real count, and the wand under the message writes the 6 back. Try the same on Round 5: only the log objects there, because the row bar watches the last round.
Make Round 5 read (3 sc, inc) x6 → 30 and watch the body widen; give Round 13 one more decrease and watch it close early. Ctrl+Z after each, or leave what you like.
Press Save. The bee is on your pattern shelf now, and it opens from there on any device. If you want it in the gallery, Share does that, and the post is public.
The wings (Designer and up)
Press New piece in the pieces bar, select the new piece's text and paste one wing. Move it onto the back with ✥, turn it with ⟳, then Duplicate the piece for the second wing and move that one to the other side. The planner writes each wing's position: and rotation: into its text.
start: magic ring

Round 1 [#FFFFFF]: 6 sc in ring → 6
Round 2 [#FFFFFF]: inc x6 → 12
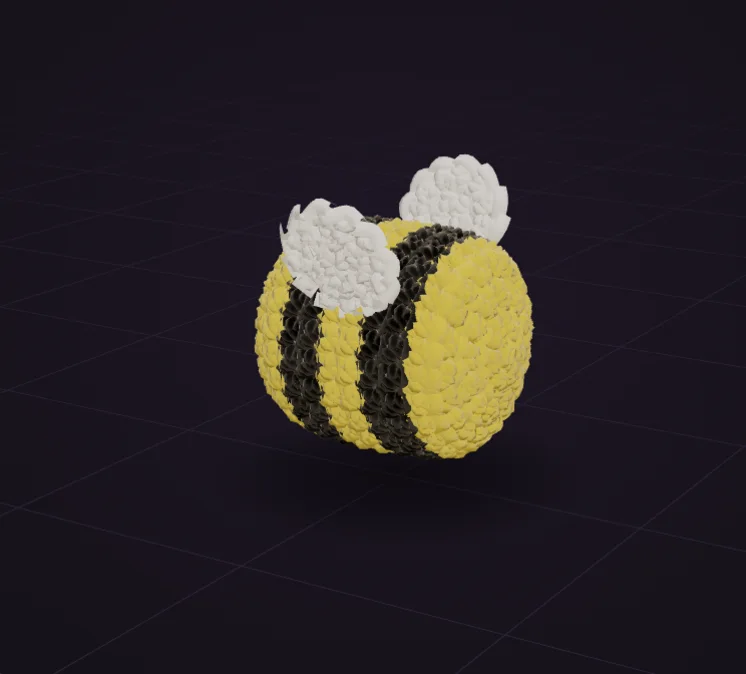
The gallery page has the whole bee with both wings already placed, and an Open in editor button. That works on every plan, since nothing in it is above Core.
Questions new users ask
- How do you write a crochet pattern?
- One round per line, in the order you work it: the round number, the stitches, and the count you should end that round on.
Round 4: (2 sc, inc) x6 → 24is a whole round. Begin from a magic ring for a piece worked in the round or a chain for a flat one, work each round's count out from the round above it, and close withfasten off. The rest is shaping: increases widen the piece, decreases close it, and a round with neither keeps it straight. Write it in US terms (sc, hdc, dc, inc, dec) and the counts are the part to be careful with, which is what a planner is for. - Do I need an account to use the pattern planner?
- Yes, and it is free. A free account saves up to 3 patterns, has no time limit and asks for no card. The planner is account-only so your work has somewhere to live between visits.
- Does it use US or UK crochet terms?
- Patterns are written in US terms: sc, dc, inc, dec. The stitch library shows the UK and Hungarian names beside every stitch, and the pattern pages print the UK equivalent wherever the two collide, since a UK double crochet is a US single crochet.
- Can I paste a pattern I already have?
- Yes, as long as it is one round per line with the round number in front. The planner reads repeats in either order, ranges like
Round 6-7, front and back loop notation and stitches worked into one stitch. A line it cannot read is reported in the log rather than dropped, so you see exactly which lines need a touch. - Why does the 3D model stop before the end of my pattern?
- Because a round below the last one it built cannot sit on the round before it: it needs more base stitches than that round made. The log names the line. Fix that round and the rest builds. The model is cut there on purpose, so that a shape you see is always a shape you could crochet.
- Which plan do I need?
- Free writes and checks a pattern, builds it in 3D, colours single stitches and saves up to 3 patterns. Hobby adds the wider colour scopes, more stitches and the text export. Designer adds pieces of your own, the accessories, the complete stitch library, the PDF and the timelapse video. Studio adds PDF+, embroidery and a commercial licence for what you design. The pricing page lists all of it side by side.
- Does it work on a phone?
- Yes. The workspace becomes two tabs, Pattern and 3D, and the colour picker sits under the 3D view. Pasting a pattern and colouring it are fine on a phone; writing a long one is more comfortable with a keyboard, as writing usually is.
- Which browsers can record the timelapse?
- A current Chrome, Edge or Firefox. The video is recorded from the 3D view inside the browser and downloaded straight to your device; nothing is sent anywhere.
Ready to plan your first pattern?
Create your free account, open the pattern planner, and start writing your first row.
Open the pattern planner · Free patterns with a 3D preview · How to read a crochet pattern · Free crochet tools · Plans and prices